Difference between revisions of "GPU Instancer:FAQ"
GurBu Admin (talk | contribs) (→How to convert shaders manually to support GPU Instancer?) |
GurBu Admin (talk | contribs) (→How can I convert shaders manually to support GPU Instancer?) |
||
| Line 61: | Line 61: | ||
| − | + | ==== For vertex/fragment and surface shaders ==== | |
<div class="code"><div style="font: normal normal 1em/1.2em monospace; margin:0; padding:0; background:none; vertical-align:top;">...</div> | <div class="code"><div style="font: normal normal 1em/1.2em monospace; margin:0; padding:0; background:none; vertical-align:top;">...</div> | ||
| Line 93: | Line 93: | ||
[[File:Amplify Shader Editor Directives.png|none|500px]] | [[File:Amplify Shader Editor Directives.png|none|500px]] | ||
| + | |||
| + | |||
| + | <div style="clear: both"></div> | ||
=== How to build for Android platforms? === | === How to build for Android platforms? === | ||
Revision as of 13:54, 5 December 2018
About | Features | Getting Started | Terminology | Best Practices | F.A.Q.
Contents
- 1 General Questions
- 1.1 What are the Minimum Requirements?
- 1.2 How does GPU Instancer work?
- 1.3 How is GPUI Different from the Unity Material Instancing Option?
- 1.4 How can I convert shaders manually to support GPU Instancer?
- 1.5 How to build for Android platforms?
- 1.6 How to define multiple prefabs at once?
- 1.7 How to render prefab instances without instantiating GameObjects?
- 1.8 How can I Increase Billboard Visibility Distances Beyond Manager Limits?
- 2 Troubleshooting
- 3 Compatibility with Other Assets
General Questions
What are the Minimum Requirements?
To provide the fastest possible performance, GPU Instancer utilizes indirect GPU instancing using Unity's DrawMeshInstancedIndirect API and Compute Shaders. Following are the minimum requirements for GPU instancing and Compute Shader support:
- DirectX 11 or DirectX 12 and Shader Model 5.0 GPU (Windows, Windows Store)
- Metal (macOS, iOS)
- OpenGL Core 4.3 (Windows, Linux)
- Vulkan (Android, Windows, Linux)
- OpenGL ES 3.1 (Android 8.0 Oreo or later)
- Modern Consoles (PS4, Xbox One)
Please also note that even though some integrated graphics cards may satisfy these requirements, they will not provide the boost you can get from GPU Instancing. Therefore, hardware with a dedicated GPU is recommended.
How does GPU Instancer work?
The aim of GPUI is to provide an easy to use interface to use indirect instancing without having to go through the learning curves of (or extensive development times of) GPU programming and Compute Shaders. To provide this, GPUI analyzes a prefab (or Unity terrain) and uses indirect instancing to render its instances (or detail/tree prototypes). Upon sending the mesh and material data to the GPU once, GPUI creates various GPU buffers and dispatches Compute Shaders on every frame to manipulate the instance data in these buffers. This approach takes the load completely off the CPU and uses the GPU for all rendering processes - so that the CPU threads work more efficiently for game scripts. GPUI also uses different optimization techniques to effectively work on different platforms; so that whether the target platform is a high-end PC, VR, or a modern mobile device, GPUI provides the best indirect instancing strategy.
If you're not familiar with these concepts, you can take a look at the Terminology Page for more information. In any case, here is a basic primer on GPU instancing:
(Indirect) GPU instancing works by sending mesh/material data to the GPU in a single draw call. This reduces the amount of batching to one even if there are hundreds or even thousands of the same mesh/material combination. This removes the bottleneck that occurs when sending mesh and material data from CPU to the GPU, and results in higher fps if there are many of the same mesh-material combinations. That is, GPU instancing helps in scenarios where you have many instances of the same game object.
How is GPUI Different from the Unity Material Instancing Option?
Untiy provides instancing support by using the "Enable GPU instancing" option in Unity Standard and Surface shaders. When you use this option, Unity will handle frustum culling and culling by baked occlusion maps automatically. However, when using this option, Unity will group together instances and issue a draw call for every 500 instances in Direct3D and 125 instances in OpenGL ES 3, OpenGL Core, and Metal. The reason for this limitation is that Unity is aiming to support as many devices as possible, and older devices have a smaller GPU buffer size.
Other options in Unity are the DrawMeshInstanced and the DrawMeshInstancedIndirect scripting APIs. The former allows for 1023 instances per batch, and the latter does not have a limit. However, when using both of these options, you need to manage frustum, occlusion and distance culling for your instances manually.
GPU Instancer uses the indirect instancing method in the background and manages all culling operations in the GPU by making use of Compute Shaders. Furthermore, GPUI gives you a user friendly interface to add indirect instancing support for your Prefabs (with LOD groups, child hierarchies etc.) and your Unity Terrains in a few clicks - without writing any code. Since GPUI automatically generates a copy of the original shader of the material that it configures to work with itself, you are also not limited to using the Standard and Surface shaders and can use most custom shaders out of the box with it.
GPUI also builds additional features on its core by allowing you to use shadows, select shadow LODs, add/remove/update instances automatically, generate billboards and a lot more. Advanced features also include support for a no-game object workflow through an easy to use scripting API.
How can I convert shaders manually to support GPU Instancer?
GPUI has a system that automatically generates a converted version of most shaders to work with itself. This system keeps track of shader changes and handles re-conversions automatically as well. This includes most of the shaders created by shader creation editors like Amplify Shader Editor. But in some special cases, it might be needed to change the shader manually to support GPU Instancer. GPUI detects if a shader is compatible with it and will not generate a separate shader if that is the case. Here is the information you need to manually edit your shaders to support GPUI.
For vertex/fragment and surface shaders
2. SRP Shaders:
3. Amplify Shader Editor directives:

How to build for Android platforms?
- GPU Instancer requires OpenGL ES 3.1 or Vulkan API for Android platforms. Unity Editor currently can not emulate GLES 3.1. It emulates GLES 3.0 which does not support Compute Shaders. So currently it is not possible to test GPU Instancer with GLES 3.1 at Unity Editor. You can use Unity Editor with "No Emulation" and make your mobile tests with a build.
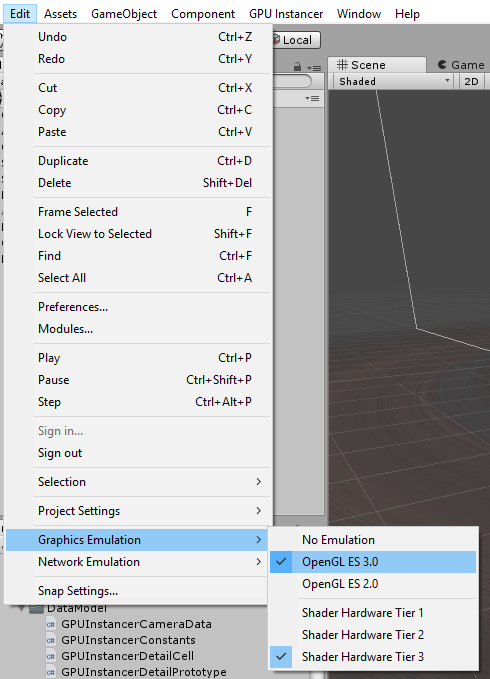
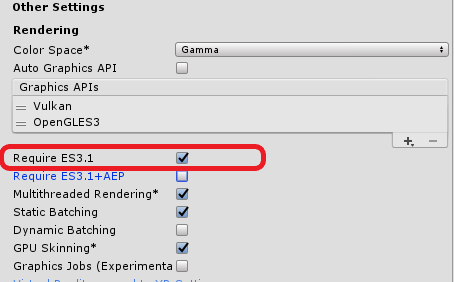
- Another reminder is that you should not forget to enable the "Require ES3.1" under Edit->Project Settings->Player->Other Settings. Otherwise Unity will disable the Compute Shaders.
- Older versions of Unity have some bugs for some GPU models on Android devices. So if you want to make an Android game, it is recommended to use the latest Unity version.
How to define multiple prefabs at once?
If you want to define multiple prefabs at once, you can do it easily with the following steps:
1. Lock the Prefab Manager Inspector window.
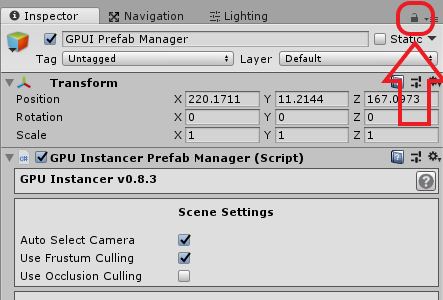
2. Select multiple prefabs from Project window.
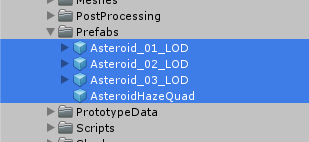
3. Drag and drop all the selected prefabs on Add button on the Prefab Manager inspector window. This will define all of the dragged prefabs as a prototype.
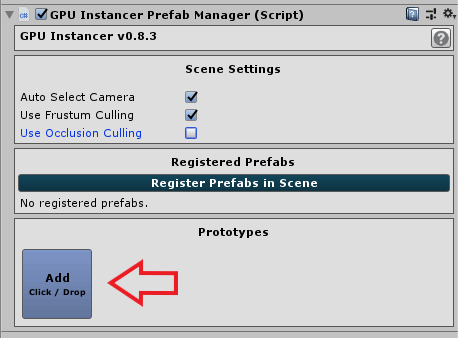
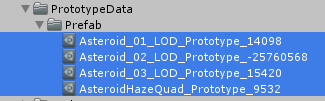
4. Afterwards, if you wish to change the settings for all of the prototypes at once, you can select the prototype ScriptableObjects under GPUInstancer/PrototypeData/Prefab folder and change the settings in the Inspector window.
How to render prefab instances without instantiating GameObjects?
With GPU Instancer, you can render prefab instances without instantiating GameObjects by supplying an array of Matrix4x4s.
How can I Increase Billboard Visibility Distances Beyond Manager Limits?
The max billboard distance is tied to the Max Tree Distance property of the manager if you are using the Tree Manager - or if you are using the Prefab Manager, it is tied to the Max Distance property of the prototype. The Tree Manager limits you to 2500 where the Prefab Manager limits to 10000.
If you need more visibility distance, you can edit the limitations of the corresponding managers from the following lines in the GPUInstancerEditorConstants.cs
public static readonly float MAX_TREE_DISTANCE = 2500;
public static readonly float MAX_PREFAB_DISTANCE = 10000;
Troubleshooting
Batch counts are higher than without GPUI
Increased batch counts usually means that there are prototypes with very few instance counts that are registered to the Prefab Manager.
GPUI works best with prefabs that have high instance counts. The reason for this is related to the nature of GPU instancing. Since prefabs with low instance counts will not gain a noticeable performance boost from GPU Instancing, it is usually better to let Unity handle their rendering. Unity uses draw call batching techniques on the background (such as dynamic batching). These techniques depend on the CPU to run and tax their operations on the CPU memory. When there are many instances of the same prefabs, these operations turn out to be too costly and the reduction in batch counts dwarf in comparison to GPU Instancing. But where the instance counts are noticeably low, the cost on the CPU when using these techniques becomes trivial - yet they will still reduce batch and draw call counts. While using GPU instancing, on the other hand, since meshes are not combined, every mesh/material combination will always be one draw call.
In short, the lowest batch counts (and the best performance gain) can be achieved by using GPUI with high instance counts. Therefore, rendering everything with GPUI where some prefabs have very few instance counts is not recommended.
The rule of thumb to keep in mind is to have only the prefabs that have high instance counts rendering with GPUI, while minimizing the amount of prototypes as much as possible. For more information on instance counts, you can check the page for best practices.
Shader Variant not Showing in Build
This issue can be solved by changing the material on your prefab to use the GPUI version of the shader (e.g. "GPUInstancer/Standard (Specular setup)") instead of the original (e.g. "Standard (Specular setup)").
The issue here is related to the way Unity handles shader variants. GPUI uses it's own version of the Standard Specular Shader, and switches to this shader at play mode. This shader is in the /resources folder, so it enters the build. However, since you are using the the variant (e.g. cutout) of the original shader, and Unity does not see the GPUI version of this variant on the prefab, it ignores this variant for the GPUI version during build time.
This is true for all the shaders that feature a variant via the "#pragma shader_feature" keyword.