GPU Instancer:FAQ
Contents
- 1 What are the Minimum Requirements?
- 2 How does GPU Instancer work?
- 3 How to add remove prefabs at runtime?
- 4 How to convert shaders manually to support GPU Instancer?
- 5 How to build for Android platforms?
- 6 How to define multiple prefabs at once?
- 7 How to render prefab instances without instantiating GameObjects?
- 8 How does Hi-Z Occlusion Culling work?
What are the Minimum Requirements?
To provide the fastest possible performance, GPU Instancer utilizes Indirect GPU Instancing using Unity's DrawMeshInstancedIndirect method and Compute Shaders. Following are the minimum requirements for GPU instancing and Compute Shader support.
- DirectX 11 or DirectX 12 and Shader Model 5.0 GPU (Windows, Windows Store)
- Metal (macOS, iOS)
- OpenGL Core 4.3 (Windows, Linux)
- Vulkan (Android, Windows, Linux)
- OpenGL ES 3.1 (Android 8.0 Oreo or later)
- Modern Consoles (PS4, Xbox One)
How does GPU Instancer work?
GPU instancing works by sending mesh/material data to the GPU in a single draw call. This reduces the amount of batching to one even if there are hundreds or even thousands of the same mesh/material combination. This removes the bottleneck that occurs when sending mesh and material data from CPU to the GPU, and results in higher fps if there are many of the same mesh-material combinations. That is, GPU instancing helps in scenarios where you have many instances of the same game object.
GPU Instancer further builds on this concept by applying various culling and LOD operations directly in the GPU and rendering only the relevant instances on the screen. This is why frustum and occlusion culling systems included with GPU Instancer are designed to work with GPU instancing only. What they do is to reduce the number of objects drawn for each prototype that are defined on the GPUI Managers. So let's say you have 1000 instances of a prefab - to draw these, GPU Instancer makes only 1 draw call with the count 1000 (this count is stored in GPU memory). When you use frustum and/or occlusion culling, this count is modified in GPU according to culling results. So it makes 1 draw call with a count less than 1000 - and rendering speed up further because there are less objects that are actually rendered.
How to add remove prefabs at runtime?
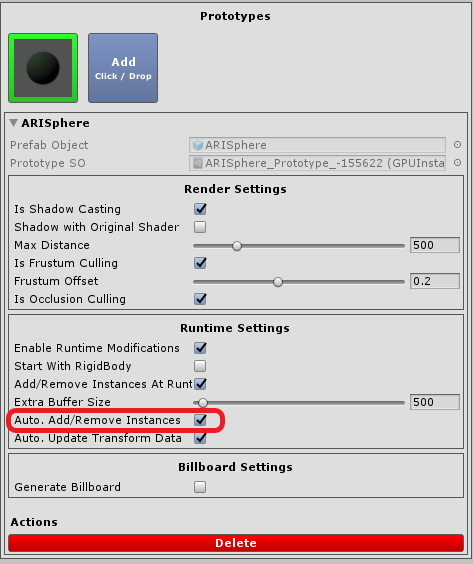
- Easiest way is to enable Auto. Add/Remove Instances option in the prototype options. When enabled, the Prefab Manager will add a script called "GPUInstancerPrefabRuntimeHandler" to the prefab object and handle all runtime changes automatically.
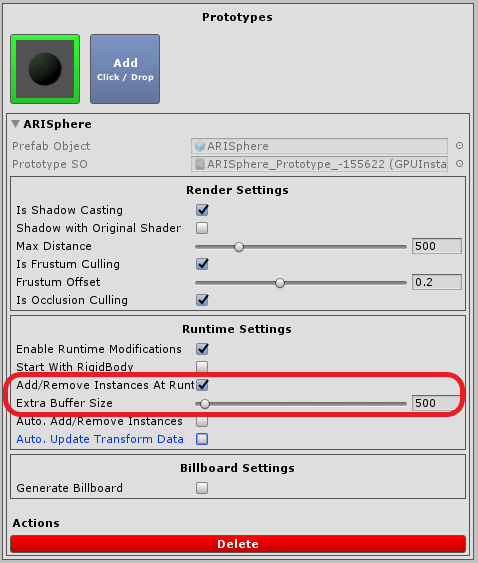
- Optionally you can add prefab instances through our API methods with the AddPrefabInstance and RemovePrefabInstance methods. Keep in mind that Add/Remove Instances At Runtime option should be enabled in the prototype definition for this API methods to work. Also Extra Buffer Size should have high enough number to add all the prefab instances generated at runtime.
- The last option is to register the prefab instances and reinitialize the Prefab Manager with first calling RegisterPrefabInstanceList method and then calling InitializeGPUInstancer method.
   public class GPUIRegisterPrefabInstances : MonoBehaviour
   {
       // Keeping a static reference to the manager so it can be shared between scenes.
       public static GPUInstancerPrefabManager prefabManager;
       // The list of prefab instances in scene
       public List<GPUInstancerPrefab> prefabInstanceList;


       // In this example we fill the list in the Reset method which works when adding the component for the first time (or using the reset command in the inspector).
       // You can fill the list in any way you want.
       public void Reset()
       {
           // Add prefabs in the scene to the list
           prefabInstanceList = new List<GPUInstancerPrefab>(FindObjectsOfType<GPUInstancerPrefab>());
       }

       void Start()
       {
           // Find the prefab manager and set it to the static property
           if(prefabManager == null && GPUInstancerAPI.GetActiveManagers() != null)
           {
               GPUInstancerManager manager = GPUInstancerAPI.GetActiveManagers().Find(m => m is GPUInstancerPrefabManager);
               prefabManager = (GPUInstancerPrefabManager)manager;
           }

           // Register the prefab instance list to the manager
           if (prefabManager != null && prefabManager.isActiveAndEnabled)
           {
               GPUInstancerAPI.RegisterPrefabInstanceList(prefabManager, prefabInstanceList);
               GPUInstancerAPI.InitializeGPUInstancer(prefabManager);
           }
       }
   }
How to convert shaders manually to support GPU Instancer?
How to build for Android platforms?
How to define multiple prefabs at once?
How to render prefab instances without instantiating GameObjects?
How does Hi-Z Occlusion Culling work?
In occlusion culling (in general), the most important idea is to never cull visible objects. After this, the second-most important idea is to cull fast. GPUI's culling algorithm makes the camera generate a depth texture and use this to make culling decisions in the compute shaders. There are various advantages of this (e.g. you don't need to bake occlusion maps, can use culling with dynamic occluders, etc.) and it is extremely fast since all the operations are executed in the GPU. However, the culling accuracy is ultimately limited by the precision of the depth buffer. On this point, GPUI analyzes the depth texture, and decides how accurate it can be without compromising performance and culling actually visible instances.
As you can see in the images below, the depth texture is a grayscale representation of the camera view where white is close to the camera and black is away.


As the distance between the occluder and the instances become shorter with respect to the distance from the camera, their depth representation become closer to the same color:

In short, given the precision of the depth buffer, GPUI makes the best choice to cull instances for better performance - but also without any chance to cull any visible objects.