Difference between revisions of "GPU Instancer:Features"
GurBu Admin (talk | contribs) (→Ability to Remove instances inside bounds or colliders at runtime) |
GurBu Admin (talk | contribs) (→Ability to Remove instances inside bounds or colliders at runtime) |
||
| Line 181: | Line 181: | ||
<br> | <br> | ||
| − | === Ability to | + | === Ability to remove instances inside bounds or colliders at runtime === |
---- | ---- | ||
Revision as of 20:33, 8 February 2019
About | Features | Getting Started | Terminology | Best Practices | F.A.Q.
[Documentation coming soon]
Contents
- 1 General Features
- 1.1 Tens of thousands of objects rendered lightning fast in a single draw call
- 1.2 GPU frustum culling
- 1.3 GPU occlusion culling
- 1.4 Automatically configured custom shader support
- 1.5 Supports HDRP and LWRP render pipelines
- 1.6 Complex hierarchies of prefabs instanced with a single click
- 1.7 Multiple sub-meshes support
- 1.8 LOD Groups and cross-fading support (with animation or fade transition width)
- 1.9 Automatic 2D Billboard Generation System
- 1.10 Shadows casting and receiving support for instances (frustum culled instances still can cast shadows)
- 1.11 Unity 5.6 support
- 1.12 Well documented API for procedural scenes and runtime modifications (examples included)
- 1.13 Ability to remove instances inside bounds or colliders at runtime
- 1.14 Ability to extend with custom Compute Shaders
- 1.15 Example scenes that showcase GPU Instancer capabilities
- 2 Prefab Instancing Features
- 2.1 Ability to automatically instance prefabs at your scene that you distribute with your favorite prefab painting tool
- 2.2 Automatically Add-Remove prefab instances without any aditional code
- 2.3 Nested Prefabs support (Unity 2018.3 and later)
- 2.4 Add-Remove-Update prefab instances with or without instantiating GameObjects
- 2.5 Automatic detection and updating of transform position, rotation and scale changes
- 2.6 Full or area localized rigidbody and physics support
- 2.7 Instance based material variations through API (similar to Material Property Blocks)
- 2.8 Enabling and disabling instancing at runtime per instance basis
- 2.9 API to manage instanced prefabs at runtime
- 2.10 Includes mobile demo scene with custom controllers
- 3 Detail Instancing Features
- 3.1 Dense grass fields and vegetation with very high frame rates
- 3.2 Included vegetation shader with wind, shadows, AO, billboarding and various other properties
- 3.3 Support for custom shaders and materials
- 3.4 Cross quadding support: automatically turns grass textures to crossed quads
- 3.5 Ability to paint prefabs with custom materials on Unity terrain (with Unity terrain tools)
- 3.6 Ability to use prefabs with LOD Groups on Unity terrain
- 3.7 Further performance improvements with automatic spatial partitioning
- 3.8 API to manage instanced terrain detail prototypes at runtime (examples included)
- 3.9 Editor GPU Instancing simulation
- 4 Tree Instancing Features
- 5 Third Party Integrations
General Features
Tens of thousands of objects rendered lightning fast in a single draw call

GPU Instancer is an out of the box solution to display extreme numbers of objects on screen with high performance. With a few mouse clicks, you can instance your prefabs and Unity terrain details and trees. To provide the fastest possible performance, GPU Instancer utilizes Indirect GPU Instancing using Unity's DrawMeshInstancedIndirect method and Compute Shaders. GPU Instancing results in magnitudes of performance improvement over static batching and mesh combining. Also, other available solutions for GPU Instancing (including Unity's material option and the DrawMeshInstanced method) fail short on limited buffer sizes and therefore result in more draw calls and less performance. By using the indirect method GPU Instancer aims to provide the ultimate solution for this, and increases performance considerably while rendering the same mesh multiple times.
You can take a look at the Terminology and Best Practices pages for detailed information on GPU Instancing and its best usages.
Whether your game scenes include asteroids in space, houses in a city or forests with dense grass and trees, GPU Instancer can help you get the most out of GPU Instancing in Unity for a better performance.
GPU frustum culling

GPU Instancer by default does not draw instances that are not visible in the camera. This saves GPU resources and results in increased performance. Furthermore, GPU Instancer does all the camera frustum testing and the required culling operations for this with Compute Shaders in the GPU before rendering the instances. Because of this, the culling operations are both faster and they do not take any time in the CPU allowing for more room to run game scripts.
For more information on Frustum Culling and how GPUI implements it, you can take a look at this page.
GPU occlusion culling

GPU Instancer comes with a GPU based Occlusion Culling feature that works out of the box without the need to bake occlusion maps or any setup at all. This feature uses an implementation of the Hierarchical Z-Buffer (Hi-Z) Occlusion Culling technique, and thus uses the camera's depth for visibility tests. Since all these tests run in the GPU, the operations to decide which instances are visible leverage the power of the graphics card and therefore minimize the overhang created by these visibility tests.
For more information on Occlusion Culling and how GPU Instancer implements it, you can take a look at this wiki page. For best practices on how to utilize this feature, you can check the best practices wiki page.
Automatically configured custom shader support

GPU Instancer supports most custom shaders out of the box. The Auto-configuration feature automatically creates a GPUI compatible version of the original shader. GPUI also tracks changes to all the shaders that are used by its instanced prototypes and re-creates the compatible shader if there are any changes in the original. This all works in the background so that you don't have to do any extra work for shader compatibility.
GPUI also supports the Standard and Standard (Specular) Unity built in shaders by default. If you need to use other built-in Unity shaders, you can download these from the Unity Download Archive and GPUI will auto-configure them to work with itself as well.
If for any reason you need to manually configure a shader to work with GPUI, you can find the information on how to achieve this in this wiki document.
Supports HDRP and LWRP render pipelines

GPU Instancer supports the new High Definition and Lightweight Render Pipelines. GPUI auto-configures the shaders used by these SRP workflows just like any other custom shader.
Complex hierarchies of prefabs instanced with a single click
GPU Instancer does not impose any limitations on how the prefab should be like in order to instance it. You can have as many levels of children in the prefab's hierarchy as you would like. This helps especially when using GPUI in your existing scenes since the scene elements are not required to be specially designed for use with GPUI.
For information on what kinds of prefabs will benefit most from GPU Instancing, you can take a look at the Best Practices wiki page.
Multiple sub-meshes support
Unity uses one material for each submesh that a mesh has. GPU Instancer fully supports this by instancing prefabs that have multiple submeshes in multiple draw calls. A tree prefab that has a single mesh but two materials, (e.g. one for bark and one for leaves) would amount to two draw calls made by GPU Instancer. Since GPUI uses the indirect GPU instancing method, this will amount to two draw calls even if there are 50 thousand trees.
In short, GPUI does not impose a limit on how the meshes should be like and works with multiple submeshes automatically.
LOD Groups and cross-fading support (with animation or fade transition width)

GPU Instancer features full support for LOD Groups. If a prefab has an LOD Group on it, GPUI will auto detect this and instance each LOD level seperately. All the LOD distance calculations are made in the GPU for the best possible instancing performance. You can choose between dither cross-fading or animated LOD transitions.
Shadows are also fully supported for LOD Groups. Furthermore, GPUI allows you to choose which LOD level the shadows should be drawn from for each instance LOD. Using this feature, you can optimize the performance of your instances even further by using shadows from lower level LODs for mid LOD levels, or turning shadows off completely for lower LOD levels.
Automatic 2D Billboard Generation System

GPU Instancer comes with a billboard generator system. A GPUI billboard is a simple quad that shows snapshots of the object from different angles depending on the camera viewing angle. GPUI's billboard generator is mainly designed for use with trees so it generates snapshots of view angles around the world y axis. This means that the billboards do not have view perspectives from up or down.
Bilboards are a great way to increase performance while having vast viewing distances. GPUI adds the generated billboard automatically as the final LOD level (even if the prefab does not have an LOD Group on it). You can also use a custom mesh and material for the billboard if you do not wish to use the billboard that GPUI generates.
Shadows casting and receiving support for instances (frustum culled instances still can cast shadows)

GPU Instancer features full support for shadow casting and receiving for its instances. Shadows are drawn from a separate buffer and because of this GPUI gives flexible control over how shadows are handled. As such, shadows are drawn inside the defined shadow distance and they are not frustum culled. This also prevents any "shadow popping" issues that may be caused by instances that are culled because they are out of the camera frustum.
Optionally, GPUI allows for frustum culling on shadows as well. This is an ideal option for scenarios where shadow popping would not be an issue (e.g. top down cameras, etc.).
GPUI also gives you the option to use a custom shadow distance per prototype - allowing you to fine-tune your scenes for a better performance. The default distance for shadows when creating a prototype is the same with the shadow distance that is defined in the Unity quality settings in your project.
Unity 5.6 support

GPU Instancer provides full support for all versions of Unity from Unity 5.6 and above.
Well documented API for procedural scenes and runtime modifications (examples included)

GPU Instancer provides an extensive API for runtime scripting. For more information on the API methods and their definition, you can check the API Documentation page.
Ability to remove instances inside bounds or colliders at runtime

GPU Instancer comes with a component that allows you to easily remove instances from your scenes at runtime without any code. You can attach this component to any GameObject with a Collider on it. When instantiated at runtime, this GameObject will then remove any instances that fall inside its Collider (or optionally Bounds). For detailed information on how to use this component, you can check the Getting Started page.
This feature is also integrated into the GPU Instancer API to allow you to achieve the same effect during runtime inside your scripts. You can also use the API to persist the state of removed instances, etc.
Ability to extend with custom Compute Shaders
[Documentation coming soon]
Example scenes that showcase GPU Instancer capabilities
[Documentation coming soon]
Prefab Instancing Features
Ability to automatically instance prefabs at your scene that you distribute with your favorite prefab painting tool
[Documentation coming soon]
Automatically Add-Remove prefab instances without any aditional code
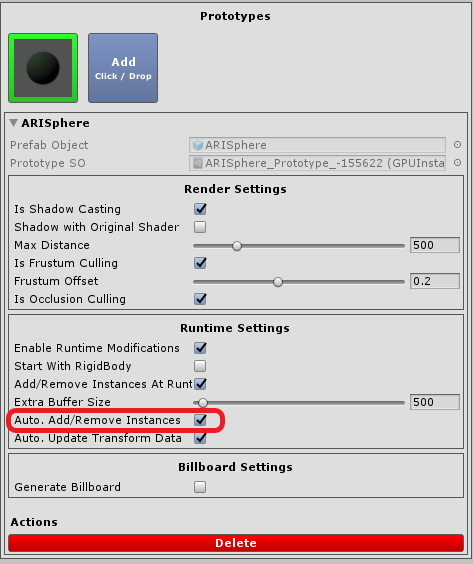
1. Easiest way is to enable Auto. Add/Remove Instances option in the prototype options. When enabled, the Prefab Manager will add a script called "GPUInstancerPrefabRuntimeHandler" to the prefab object and handle all runtime changes automatically.
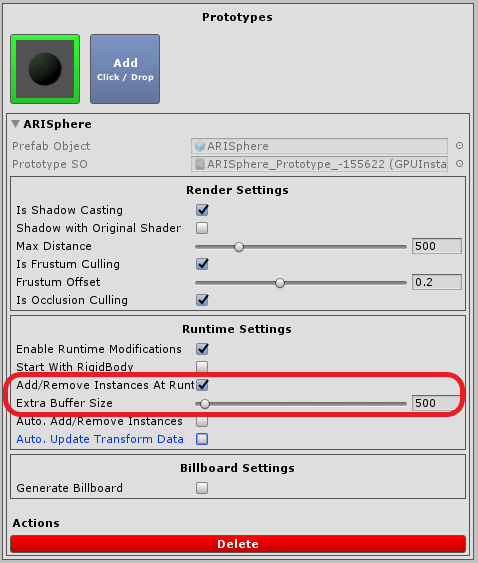
2. Optionally you can add prefab instances through our API methods with the AddPrefabInstance and RemovePrefabInstance methods. Keep in mind that Add/Remove Instances At Runtime option should be enabled in the prototype definition for this API methods to work. Also Extra Buffer Size should have high enough number to add all the prefab instances generated at runtime.
3. Another option is to register the prefab instances and reinitialize the Prefab Manager with first calling RegisterPrefabInstanceList method and then calling InitializeGPUInstancer method.
Nested Prefabs support (Unity 2018.3 and later)
[Documentation coming soon]
Add-Remove-Update prefab instances with or without instantiating GameObjects
With GPU Instancer, you can render prefab instances without instantiating GameObjects by supplying an array of Matrix4x4s.
Automatic detection and updating of transform position, rotation and scale changes
[Documentation coming soon]
Full or area localized rigidbody and physics support
[Documentation coming soon]
Instance based material variations through API (similar to Material Property Blocks)
[Documentation coming soon]
Enabling and disabling instancing at runtime per instance basis
[Documentation coming soon]
API to manage instanced prefabs at runtime
[Documentation coming soon]
Includes mobile demo scene with custom controllers
[Documentation coming soon]
Detail Instancing Features
Dense grass fields and vegetation with very high frame rates
[Documentation coming soon]
Included vegetation shader with wind, shadows, AO, billboarding and various other properties
[Documentation coming soon]
Support for custom shaders and materials
[Documentation coming soon]
Cross quadding support: automatically turns grass textures to crossed quads
[Documentation coming soon]
Ability to paint prefabs with custom materials on Unity terrain (with Unity terrain tools)
[Documentation coming soon]
Ability to use prefabs with LOD Groups on Unity terrain
[Documentation coming soon]
Further performance improvements with automatic spatial partitioning
[Documentation coming soon]
API to manage instanced terrain detail prototypes at runtime (examples included)
[Documentation coming soon]
Editor GPU Instancing simulation
[Documentation coming soon]
Tree Instancing Features
Dense forests with very high frame rates
[Documentation coming soon]
Speed Tree support with wind animations
[Documentation coming soon]
Tree Creator support with wind animations
[Documentation coming soon]
Included billboard baker and renderers
[Documentation coming soon]
Custom vertex color wind animation support for Soft Occlusion Tree shaders
[Documentation coming soon]
Third Party Integrations
Gaia integration
[Documentation coming soon]
Map Magic integration
[Documentation coming soon]