Difference between revisions of "GPU Instancer Pro:GettingStarted"
GurBu Admin (talk | contribs) (→Statistics Tab) |
GurBu Admin (talk | contribs) (→The Detail Manager) |
||
| Line 166: | Line 166: | ||
=== The Detail Manager === | === The Detail Manager === | ||
| + | ---- | ||
==== Detail Manager Settings ==== | ==== Detail Manager Settings ==== | ||
Revision as of 00:46, 10 April 2024
About GPU Instance Pro | Getting Started | Terminology | Best Practices | API Documentation | F.A.Q.
GPU Instancer Pro consists of various main Monobehavior classes called Managers. The most commonly used ones are the Prefab Manager, Detail Manager and Tree Manager. The managers are designed with mainly ease of use in mind, and adding them to your scene is as easy as clicking a menu item.
On this page, you will find information about these managers and everything GPUI comes with - including, various tools and components that will quickly get you started using GPUI Pro.
Contents
Quick Start
The Prefab Manager
- Add Prefab Manager:
Tools -> GPU Instancer Pro -> Add Prefab Manager - Click on the Add button.
- Select the prefabs with or expected to have many instances in the scene. (See Instance Counts)
- Enable the necessary options under Prefab Prototype Settings
The Tree Manager
- Add Tree Manager:
Tools -> GPU Instancer Pro -> Add Tree Manager For Terrains
The Detail Manager
- Add Detail Manager:
Tools -> GPU Instancer Pro -> Add Detail Manager For Terrains
No-GameObjects Workflow
- See RegisterRenderer and SetRenderParams API methods
Manager Setup
Common Manager Settings
The following Manager Settings are common in every manager.
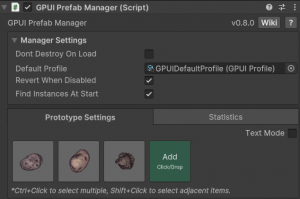
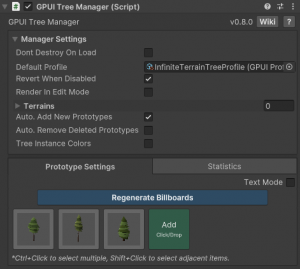
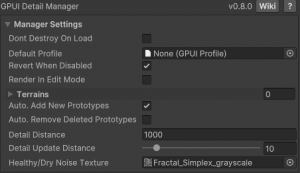
Dont Destroy On Load: When enabled, the GPUI Manager will not be destroyed when loading a new Scene.
Default Profile: New prototypes that are added to the Manager will use this prototype by default.
Revert When Disabled: Enable default rendering when the manager is disabled.
Render In Edit Mode: When enabled, the GPUI Manager will render the objects in edit mode.
Profile Settings
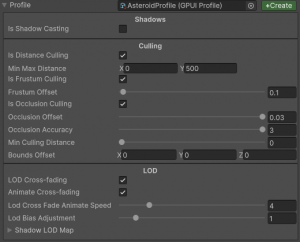
Profile contains settings related to culling and LOD calculations. All active profile settings are uploaded to a GPU buffer at runtime.
Is Shadow Casting: Is Shadow Casting specifies whether the object will cast shadows or not. Enabling shadow casting requires extra shadow passes, resulting in additional rendering operations. GPU Instancer implements various techniques to optimize these operations, but disabling shadow casting when unnecessary can enhance performance.
Custom Shadow Distance: When Custom Shadow Distance is set to 0, GPU Instancer will render shadows based on the Quality Settings. You can adjust this setting to specify a lower value, effectively culling shadows for distant objects.
Is Cull Shadows: If enabled, culling results will also be applied to the shadows. This will result in more performance, but might also lead to less consistency in shadows.
Is Distance Culling: When Distance Culling is enabled, you can specify minimum and maximum distance values. Objects beyond these distances will be culled.
Is Frustum Culling: Is Frustum Culling determines whether objects outside the camera's view frustum will be rendered. When enabled, GPU Instancer will exclude objects outside the frustum from rendering, enhancing performance. It's advisable to enable frustum culling unless there's a specific reason not to.
Frustum Offset: Frustum Offset expands the camera frustum planes, affecting the area within which objects are rendered when frustum culling is enabled.
Is Occlusion Culling: Is Occlusion Culling determines whether objects occluded by other objects will be rendered. When enabled, GPU Instancer will skip rendering objects that are behind others and would not normally be visible. While occlusion culling adds some additional GPU operations, it's recommended to enable it when beneficial.
Occlusion Offset: Occlusion Offset defines the depth value (ranged between 0 to 1) that the differences will be discarded while calculating culled objects from the depth texture. Higher offset values will result in less culling.
Occlusion Accuracy: Occlusion Cull Accuracy defines the accuracy of the occlusion culling. Higher values will result in more accurate culling with higher number of texture samples. 1 => 5 samples (middle point and corner points) 2 => 9 samples (adds 1/4 points) 3 => 17 samples (adds 1/8 and 3/8 points)
Min Culling Distance: Min. Culling Distance defines the minimum distance that any kind of culling will occur. If it is a value higher than 0, the instances with a distance less than the specified value to the Camera will not be culled.
Bounds Offset: Bounds Offset can be used to increase the bounding box size of the prototype. This will affect the culling and LOD calculations. It is particularly useful for prototypes with shaders that modify vertex positions.
LOD Cross-fading: LOD Cross-Fade enables cross-fade style blending between the LOD levels of this prototype. This can have a minor impact on performance since during cross-fading, both LOD levels will be rendering.
LOD Bias Adjustment: The LOD Bias Adjustment value effects the LOD level distances per prototype. When it is set to a value less than 1, it favors less detail. A value of more than 1 favors greater detail.
Shadow LOD Map: Shadow LOD Map can be utilized to adjust the level of detail used for rendering shadows for each LOD.
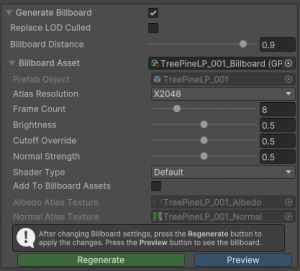
Billboard Settings
GPU Instancer Pro has the capability to automatically generate billboard renderers for prefabs. However, it's important to note that the billboard system is primarily designed for terrain trees. Generating billboards for prefabs that do not use default Unity tree shaders (such as SpeedTree, TreeCreator, or SoftOcclusion shaders) might lead to unexpected results.
Generate Billboard: When Generate Billboard option is enabled, a billboard mesh and material will be created and added as the last LOD to the prototype.
Replace LOD Culled: When enabled, the billboard will replace the Culled section of the LOD Group component, instead of using a custom distance value.
Billboard Distance: The Billboard Distance value is similar to the LOD percentage setting on the LOD Group component. For example a value of 0.9 is similar to 10% on the LOD Group component.
Atlas Resolution: Atlas Resolution defines the resolution of the billboard textures. Higher resolutions result in better looking billboards, but use more memory. Texture atlases are not square for 2D billboards; so for example "x2048" option results in a 2048x256 texture resolution.
Frame Count: Frame Count defines the total amount of snapshots that are taken from different angles for this billboard. Higher frame counts result in more accurate view differences in different view angles, but result in lower resolution frames since they are all packed in the same atlas.
Brightness: You can use Brightness to adjust the brightness of the billboard textures. A zero value is fully black whereas one is lighter.
Cutoff Override: You can use the Cutoff Override option to override the alpha cutoff value of the original materials for the billboard textures. This is normally necessary if you use the alpha value as some other data (e.g. metallic, etc.) in the textures of the material for the prefab of this prototype.
Normal Strength: Normal Strength controls the intensity of the normal texture effect. Values lower than 1 will decrease it, while higher values will amplify the effect of the normal texture.
Add To Billboard Assets: When Add To Billboard Assets option is enabled, the billboard asset will be added to the 'Billboard Assets' List inside GPUI Runtime Settings, which will make the billboard asset discoverable when creating prototypes at runtime.
Statistics Tab
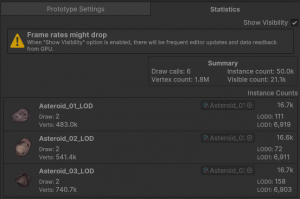
The Statistics Tab provides insights into GPU Instancer rendering information, enabling users to identify bottlenecks and optimize performance.
Show Visibility: When enabled, the GPUI Manager will readback culling results from the GPU and display additional information such as vertex counts and visible LOD counts.
The Prefab Manager
By adding your prefabs to the Prefab Manager, the prefab instances you add to your scenes are automatically rendered by GPU Instancer. It also provides additional functionality such as adding/removing/updating instances at runtime. Note that the Prefab Manager only accepts user created prefabs. It will not accept prefabs that are generated when importing your 3D model assets.
When using the Prefab Manager, the most important thing to have in mind is that you should only add the prefabs that you have many instances of as prototypes. GPU Instancer uses various techniques to increase performance, but ultimately it renders its prototypes using GPU Instancing. Therefore, it is highly recommended to read the Terminology and the Best Practices pages to familiarize with the concept of GPU Instancing and to get the most out of the Prefab Manager and GPUI in general.
Prefab Manager Settings
Find Instances At Start: When enabled, the Prefab Manager will search for GPUIPrefab components in the scene during initialization. When disabled, you can manually register the prefab instances in the scene, using the Register Instances In Scene button.
Prefab Manager Prototype Settings
Transform Updates: When enabled, the transform data of the prefab instances will be read and uploaded to a GPU buffer every frame. If the prefab instances are not changing their transform data, it is better to keep it disabled. If there are rarely changes, you can use the GPUIPrefabManager.UpdateTransformData method to notify the Prefab Manager about the changes while keeping this setting disabled.
Auto. Add/Remove: When enabled, GPUIPrefabAutoAddRemove component will be added to the prefab. The instances containing this component will be automatically added to or removed from the Prefab Manager.
The Detail Manager
Detail Manager Settings
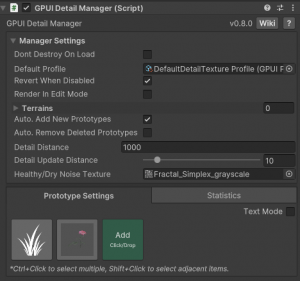
Render In Edit Mode: When enabled, the GPUI Manager will render the objects in edit mode.
Terrains: List of Terrains this manager is currently rendering the detail and tree instances for.
Auto. Add New Prototypes: When enabled, new prototypes will be created on the Manager when there are prototypes on the terrains that do not match any of the existing prototypes on the Manager.
Auto. Remove Deleted Prototypes: When enabled, prototypes on the Manager that do not match any of the terrain prototypes will be automatically removed.
Detail Distance: Determines the maximum distance that the detail instances will be drawn.
Detail Update Distance: Detail instances are updated based on camera position. Update distance determines after how much camera movement the detail instances will be updated. When set to zero, the detail instances will be updated every frame.
Healthy/Dry Noise Texture: Healthy/Dry Noise Texture is used for determining detail instance scales and colors.
