Difference between revisions of "GPU Instancer Pro:GettingStarted"
GurBu Admin (talk | contribs) (→Common Manager Settings) |
GurBu Admin (talk | contribs) (→Profile Settings) |
||
| Line 57: | Line 57: | ||
=== Profile Settings === | === Profile Settings === | ||
| + | |||
| + | Profile contains settings related to culling and LOD calculations. All active profile settings are uploaded to a GPU buffer at runtime. | ||
| + | |||
| + | [[File:GPUIProProfileSettings.png|Manager Settings|thumb|left]] | ||
| + | |||
| + | |||
| + | '''Is Shadow Casting:''' Is Shadow Casting specifies whether the object will cast shadows or not. Enabling shadow casting requires extra shadow passes, resulting in additional rendering operations. GPU Instancer implements various techniques to optimize these operations, but disabling shadow casting when unnecessary can enhance performance. | ||
| + | |||
| + | '''Custom Shadow Distance:''' When Custom Shadow Distance is set to 0, GPU Instancer will render shadows based on the Quality Settings. You can adjust this setting to specify a lower value, effectively culling shadows for distant objects. | ||
| + | |||
| + | '''Is Cull Shadows:''' If enabled, culling results will also be applied to the shadows. This will result in more performance, but might also lead to less consistency in shadows. | ||
| + | |||
| + | |||
| + | '''Is Distance Culling:''' When Distance Culling is enabled, you can specify minimum and maximum distance values. Objects beyond these distances will be culled. | ||
| + | |||
| + | '''Is Frustum Culling:''' Is Frustum Culling determines whether objects outside the camera's view frustum will be rendered. When enabled, GPU Instancer will exclude objects outside the frustum from rendering, enhancing performance. It's advisable to enable frustum culling unless there's a specific reason not to. | ||
| + | |||
| + | '''Frustum Offset:''' Frustum Offset expands the camera frustum planes, affecting the area within which objects are rendered when frustum culling is enabled. | ||
| + | |||
| + | '''Is Occlusion Culling:''' Is Occlusion Culling determines whether objects occluded by other objects will be rendered. When enabled, GPU Instancer will skip rendering objects that are behind others and would not normally be visible. While occlusion culling adds some additional GPU operations, it's recommended to enable it when beneficial. | ||
| + | |||
| + | '''Occlusion Offset:''' Occlusion Offset defines the depth value (ranged between 0 to 1) that the differences will be discarded while calculating culled objects from the depth texture. Higher offset values will result in less culling. | ||
| + | |||
| + | '''Occlusion Accuracy:''' Occlusion Cull Accuracy defines the accuracy of the occlusion culling. Higher values will result in more accurate culling with higher number of texture samples. | ||
| + | 1 => 5 samples (middle point and corner points) | ||
| + | 2 => 9 samples (adds 1/4 points) | ||
| + | 3 => 17 samples (adds 1/8 and 3/8 points) | ||
| + | |||
| + | '''Min Culling Distance:''' Min. Culling Distance defines the minimum distance that any kind of culling will occur. If it is a value higher than 0, the instances with a distance less than the specified value to the Camera will not be culled. | ||
| + | |||
| + | '''Bounds Offset:''' Bounds Offset can be used to increase the bounding box size of the prototype. This will affect the culling and LOD calculations. It is particularly useful for prototypes with shaders that modify vertex positions. | ||
| + | |||
| + | |||
| + | '''LOD Cross-fading:''' LOD Cross-Fade enables cross-fade style blending between the LOD levels of this prototype. This can have a minor impact on performance since during cross-fading, both LOD levels will be rendering. | ||
| + | |||
| + | '''LOD Bias Adjustment:''' The LOD Bias Adjustment value effects the LOD level distances per prototype. When it is set to a value less than 1, it favors less detail. A value of more than 1 favors greater detail. | ||
| + | |||
| + | '''Shadow LOD Map:''' Shadow LOD Map can be utilized to adjust the level of detail used for rendering shadows for each LOD. | ||
| + | |||
=== Billboard Settings === | === Billboard Settings === | ||
=== Statistics Tab === | === Statistics Tab === | ||
Revision as of 13:36, 8 April 2024
About GPU Instance Pro | Getting Started | Terminology | Best Practices | API Documentation | F.A.Q.
GPU Instancer Pro consists of various main Monobehavior classes called Managers. The most commonly used ones are the Prefab Manager, Detail Manager and Tree Manager. The managers are designed with mainly ease of use in mind, and adding them to your scene is as easy as clicking a menu item.
On this page, you will find information about these managers and everything GPUI comes with - including, various tools and components that will quickly get you started using GPUI Pro.
Contents
[hide]Quick Start
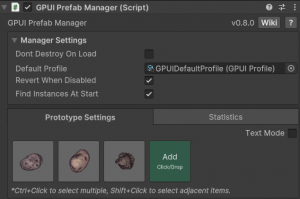
The Prefab Manager
- Add Prefab Manager:
Tools -> GPU Instancer Pro -> Add Prefab Manager - Click on the Add button.
- Select the prefabs with or expected to have many instances in the scene. (See Instance Counts)
- Enable the necessary options under Prefab Prototype Settings
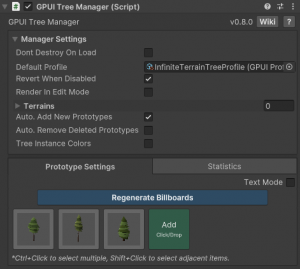
The Tree Manager
- Add Tree Manager:
Tools -> GPU Instancer Pro -> Add Tree Manager For Terrains
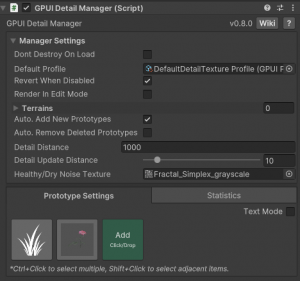
The Detail Manager
- Add Detail Manager:
Tools -> GPU Instancer Pro -> Add Detail Manager For Terrains
No-GameObjects Workflow
- See RegisterRenderer and SetRenderParams API methods
Manager Setup
Common Manager Settings
The following Manager Settings are common in every manager.
Dont Destroy On Load: When enabled, the GPUI Manager will not be destroyed when loading a new Scene.
Default Profile: New prototypes that are added to the Manager will use this prototype by default.
Revert When Disabled: Enable default rendering when the manager is disabled.
Render In Edit Mode: When enabled, the GPUI Manager will render the objects in edit mode.
Profile Settings
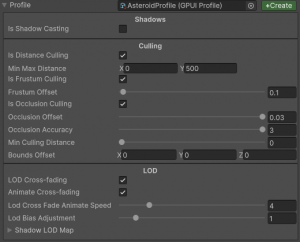
Profile contains settings related to culling and LOD calculations. All active profile settings are uploaded to a GPU buffer at runtime.
Is Shadow Casting: Is Shadow Casting specifies whether the object will cast shadows or not. Enabling shadow casting requires extra shadow passes, resulting in additional rendering operations. GPU Instancer implements various techniques to optimize these operations, but disabling shadow casting when unnecessary can enhance performance.
Custom Shadow Distance: When Custom Shadow Distance is set to 0, GPU Instancer will render shadows based on the Quality Settings. You can adjust this setting to specify a lower value, effectively culling shadows for distant objects.
Is Cull Shadows: If enabled, culling results will also be applied to the shadows. This will result in more performance, but might also lead to less consistency in shadows.
Is Distance Culling: When Distance Culling is enabled, you can specify minimum and maximum distance values. Objects beyond these distances will be culled.
Is Frustum Culling: Is Frustum Culling determines whether objects outside the camera's view frustum will be rendered. When enabled, GPU Instancer will exclude objects outside the frustum from rendering, enhancing performance. It's advisable to enable frustum culling unless there's a specific reason not to.
Frustum Offset: Frustum Offset expands the camera frustum planes, affecting the area within which objects are rendered when frustum culling is enabled.
Is Occlusion Culling: Is Occlusion Culling determines whether objects occluded by other objects will be rendered. When enabled, GPU Instancer will skip rendering objects that are behind others and would not normally be visible. While occlusion culling adds some additional GPU operations, it's recommended to enable it when beneficial.
Occlusion Offset: Occlusion Offset defines the depth value (ranged between 0 to 1) that the differences will be discarded while calculating culled objects from the depth texture. Higher offset values will result in less culling.
Occlusion Accuracy: Occlusion Cull Accuracy defines the accuracy of the occlusion culling. Higher values will result in more accurate culling with higher number of texture samples. 1 => 5 samples (middle point and corner points) 2 => 9 samples (adds 1/4 points) 3 => 17 samples (adds 1/8 and 3/8 points)
Min Culling Distance: Min. Culling Distance defines the minimum distance that any kind of culling will occur. If it is a value higher than 0, the instances with a distance less than the specified value to the Camera will not be culled.
Bounds Offset: Bounds Offset can be used to increase the bounding box size of the prototype. This will affect the culling and LOD calculations. It is particularly useful for prototypes with shaders that modify vertex positions.
LOD Cross-fading: LOD Cross-Fade enables cross-fade style blending between the LOD levels of this prototype. This can have a minor impact on performance since during cross-fading, both LOD levels will be rendering.
LOD Bias Adjustment: The LOD Bias Adjustment value effects the LOD level distances per prototype. When it is set to a value less than 1, it favors less detail. A value of more than 1 favors greater detail.
Shadow LOD Map: Shadow LOD Map can be utilized to adjust the level of detail used for rendering shadows for each LOD.


