GPU Instancer:GettingStarted
About | Features | Getting Started | Terminology | Best Practices | F.A.Q.
GPU Instancer consists of three main Monobehavior classes. These are the Prefab Manager, Detail Manager and Tree Manager. The managers are designed with mainly ease of use in mind, and adding them to your scene is as easy as clicking a menu item. On this page, you will find information about these managers that will quickly get you started using GPUI.
The Prefab Manager
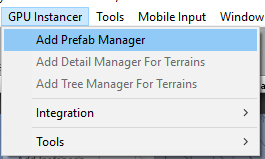
You can add a Prefab Manager from:
GPU Instancer -> Add Prefab Manager
By adding your prefabs to the GPU Instancer Prefab Manager, the prefab instances you add to your scenes are automatically rendered by GPU Instancer. It also provides additional functionality such as adding/removing/updating instances at runtime, changing material properties per instance, choosing an LOD level to render the shadows from, and much more. Note that the Prefab Manager only accepts user created prefabs. It will not accept prefabs that are generated when importing your 3D model assets.
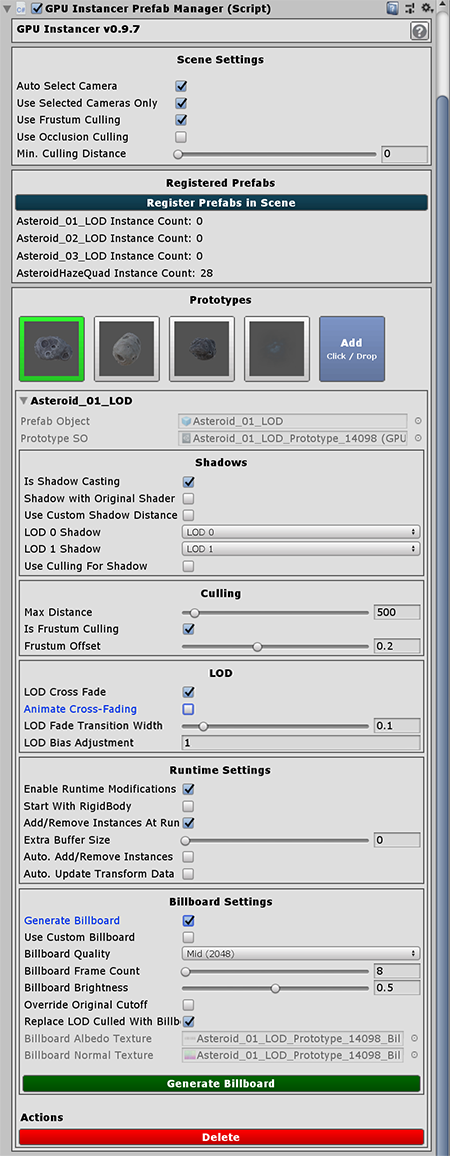
Below are the sections you will find in the Prefab Manager.
Scene Settings
Scene Settings contains scene specific settings like camera selection.
Auto Select Camera: When this checkbox is active, GPU Instancer will use the first camera with the "MainCamera" tag at startup. If the checkbox is inactive, the desired camera can be set manually. GPU Instancer uses this camera for various calculations including culling operations.
Use Selected Camera Only: If enabled, instances will only be rendered with the selected camera. They will not be rendered in other active cameras (including the Scene View camera). This may improve performance if there are other cameras in the scene that are mainly used for camera effects, weather/water effects, reflections, etc. Using this option will make them ignore GPUI, increasing performance. Please note that the scene view during play mode will no longer show GPUI instances if this is selected.
Use Frustum Culling: Toggles frustum culling globally for all the prototypes in this manager. By turning frustum culling off, you can have view GPUI prototypes in all active cameras since they will not be culled. However, please note that turning frustum culling off may result in a lower FPS than having it on. If turned on, you can still turn frustum culling off for individual prototypes.
Use Occlusion Culling: toggles occlusion culling globally for all the prototypes in this manager. If turned on, you can still turn occlusion culling off for individual prototypes. Please note that occlusion culling may lag if the FPS falls to extremely low levels. If this is a possiblitiy, it could be better to turn it off. Please also check the Best Practices section on occlusion culling.
Min. Culling Distance: You can use this slider to define the minimum distance that any kind of culling will occur. If it is a value higher than 0, the instances with a distance less than the specified value to the Camera will never be culled.
Registered Prefabs
Registered Prefabs shows the list of registered prefab instances that are currently in the scene. These instances will be rendered with GPU Instancer.
Register Prefabs in Scene: This button can be used to register the prefab instances that are currently in the scene, so that they can be used by GPU Instancer. When you add new instances to the scene using the Unity editor, you need to register them to GPUI again using this button to update the current instance counts. For adding new instances at runtime, you can check the API documentation.
Prototypes
Prototypes show the list of objects that will be rendered by GPU Instancer. To modify the settings of a prototype, you can click on its image.
Add: Click on this button to select a prefab from your project and add it as a prototype to the manager. You can also drag and drop a prefab, a prefab instance or a GPUI prototype scriptable object on this button; in all these cases the referenced prefab is added to the manager. You can take a look at this section of the Best Practices Page to see how you can add multiple prefabs like this. Please note that you can also use the Scene Prefab Importer tool to create a Prefab Manager with the selected prefab instances in your scene.
Render Settings
Render Settings can be edited individualy for each prototype.
Runtime Settings
Runtime Settings can be edited individualy for each prototype.
Billboard Settings
Billboard Settings can be edited individualy for each prototype.
The Detail Manager
Scene Settings
Scene Settings contains scene specific settings like camera selection.
Debug
Debug shows the list of registered prefab instances that are currently in the scene that will be used by GPU Instancer.
Global Detail Values
Global Detail Values settings that are applied to all detail prototypes.
Prototypes
Prototypes show the list of objects that will be used in GPU Instancer. To modify a prototype, click on its image.
Render Settings
Render Settings can be edited individualy for each prototype.
Detail Properties
Detail Properties can be edited individualy for each prototype.
Cross Quads
Cross Quads can be edited individualy for each prototype.
Foliage Shader Properties
Foliage Shader Properties can be edited individualy for each prototype.
The Tree Manager
Scene Settings
Scene Settings contains scene specific settings like camera selection.
Global Tree Values
Global Tree Values settings that are applied to all tree prototypes.
Prototypes
Prototypes show the list of objects that will be used in GPU Instancer. To modify a prototype, click on its image.
Render Settings
Render Settings can be edited individualy for each prototype.
Billboard Settings
Billboard Settings can be edited individualy for each prototype.

